TP-Link’s Kasa brand offers one of the most affordable smart security cameras in the camera. Hooking the camera to your network unlocks the full functionality, boosting your home security. So, is your Kasa camera not connecting to Wi-Fi?
Kasa camera won’t connect to your network because you are using an incompatible network frequency, running a VPN on your mobile device, or the router settings prevent device addition. Power cycle the Kasa camera and your network devices and ensure you use the compatible 2.4 GHz Wi-Fi network.
This article entails common reasons for Kasa connection failures and the troubleshooting steps to get your camera online.
Fixing Kasa Camera Not Connecting to Wi-Fi
The Kasa connection problem stems from your network settings, the mobile device, or the camera device itself. One component could easily cause a connection issue with all these moving parts.
One of these reasons could be the cause of the connection failure;
- Attempting to connect to a 5 GHz Wi-Fi network is incompatible with Kasa cameras as they only support the 2.4 GHz frequency band, like many other home devices.
- A VPN or Ad-guard enabled on your mobile device can mask your IP address and prevent access to other devices on your network.
- Router settings such as MAC address filtering, Firewall, or Port blocking may impede the camera’s connection.
- The camera is placed outside your network ranges, or you need a better signal.
- Not allowing the necessary location or Bluetooth permissions
- Failing to put the camera in pairing mode, indicated by a flashing red and green light.
- A faulty device
Ensure that your mobile device is connected to the intended 2.4 GHz Wi-Fi network and that you have disabled any VPN or Ad Guard software on your mobile device.
Also, please turn off your cellar data; it could prevent your mobile device from connecting to the camera’s hotspot during setup.
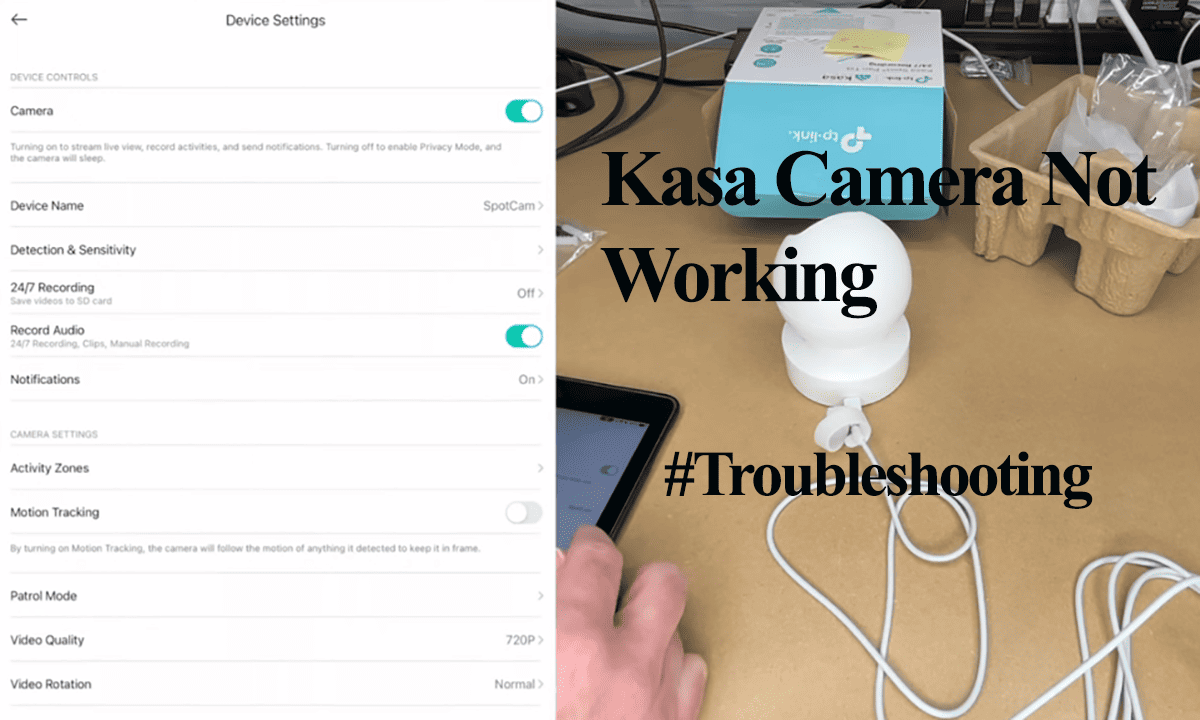
TP-Link’s Kasa line of products uses the Kasa app, don’t confuse it with the Tapo app. After installing the app, grant it location and Bluetooth access permissions.
With that said, try these troubleshooting solutions to get your camera connected;
Check your Wi-Fi network.
As with any smart device, you need a strong and stable Wi-Fi network to register and bind the new Kasa camera to your account.
So, do you have a solid Wi-Fi network? Test your network from your mobile device or use the online speed test tool to confirm your internet speeds.
Kasa cameras are only compatible with 2.4 GHz Wi-Fi networks set to WPA or WPA2 security protocol. Don’t use the newer WPA3 Wi-Fi encryption.
If your router broadcasts 2.4 and 5 GHz on a single SSID, disable the 5 GHz option to avoid conflicts. Once the camera is online, turn on the 5 GHz option.
Alternatively, separate the 2.4 and 5 GHz bands into different entities. This is my preferred option as it helps prevent further problems.
Login to your router admin panel and confirm your settings. Here are some things to confirm;
- Ensure MAC address filtering is disabled
- If your router supports Band Steering, turn it off
- Set the network channel to the standard option 1, 6, or 11
- Use WPA or WPA2 as the network encryption mode. Newer protocols like WPA3 – Only won’t work
- Disable AP/Client isolation, if available on your router.
- Check port blocking
- Confirm your network password.
If you make any changes, power cycle the router to apply them. Once your router restarts and you test the network, reconnect your Kasa camera.
Power Cycle Your Devices
Once you have ascertained you have a solid 2.4 GHz Wi-Fi network. Power cycling refreshes the device’s connection.
Therefore, power cycle the camera, network router, and mobile device. This could solve IP conflicts preventing a successful connection.
Unplug the device from the power outlet, give it 20 – 30 seconds, and plug it back. Don’t forget to reboot your mobile device.
Once all devices reboot, retry the setup process.
Camera Placement and Signal Strength
Ensure the camera is positioned optimally, allowing for a strong Wi-Fi signal.
Consider these recommendations when choosing the camera location;
- Place the camera within the range of your Wi-Fi router, avoiding significant obstructions such as walls or furniture.
- Keep the camera away from other electronic devices that could cause signal interference, such as cordless phones or microwave ovens.
- If the signal strength is weak in the camera’s intended location, you may need a Wi-Fi or range extender to enhance the signal.
I prefer setting up my device close to the primary router before moving to the final installation point.
Disable VPN and Ad guard
VPN and Ad guard mask your mobile device’s IP address; thus, it won’t communicate with other devices on your network.
When running a VPN or ad blocker, your device is virtually on another network, different from your router’s local network.
A VPN could prevent your device from discovering the camera’s hotspot.
Disable your VPN and ad guard when setting up smart devices on your network.
Factory Reset the Camera
Factory resetting clears all camera settings and rolls back the camera to the factory-release firmware. A reset can help resolve persistent connectivity issues by clearing corrupt firmware files.
Follow these instructions to perform a factory reset;
- Locate the factory reset button on your Kasa camera. It is usually a small, recessed button requiring a paperclip or a similar tool to press.
- Press and hold the reset button for about 10 seconds until the camera’s LED lights flash or you hear a sound indicating a successful reset.
- After the factory reset, you must set up your Kasa camera again from scratch, including connecting it to Wi-Fi.
Once the Kasa camera resets and enters pairing – with an orange and green status LED, confirm that you can see the camera hotspot under your mobile device’s Wi-Fi networks.
Check the Wi-Fi networks on your device settings when the camera is in set-up mode. Finding the “Kasa_Cam_XXXX’” network shows that your camera is in setup mode and broadcasting.
Try connecting to the network manually (disable your mobile data to prevent auto-switching). You probably haven’t granted the Kasa app location or Local network access permission if you can’t.
If you can find the camera’s hotspot from your mobile device, it shows that the device is working. Use the correct Wi-Fi password to hook it your network.
Bonus Solutions
Uninstall and reinstall the Kasa app – You could be experiencing a connection failure due to an outdated app. First, clear the app cache and check your respective app store to see if any updates are available.
If an update is due, download and install it on your device and try reconnecting your light. If the update method fails, uninstall and install the app afresh.
Try a different device – I had this tab that had problems connecting some smart home device brands. Once I tried setting up the device on my iPhone, it could work.
It could be the same issue with your device; try setting up the camera with a different phone (preferably running on another OS).
Faulty device – You won’t get through if the logic is corrupted. An example of a defective device case is when the camera can’t broadcast its hotspot in pairing mode. There isn’t a way to connect to its network.
Your only options with a faulty device are to return it for a replacement or contact Kasa support to claim your warranty.